Posted on 2 Comments

Poppies in the Fall

A project of remembrance

Poppies have played a role in my life since I was old enough to remember my first Remembrance Day ceremony in elementary school. Since then, those bright red, flocked plastic poppies have held a special place in my heart.

They are a fleeting thing. Seen first on November 1st on counters across the country. Worn proudly until the 11th hour of the 11th day on the 11th month when they are left on cenotaphs, memorials and gravestones throughout the British Commonwealth. I will always wear that little piece of plastic and buy one each year.

That said, I have often thought that something more tangible – beautiful even – and permanent would be a more appropriate marker for veterans.

This morning, the family got together at Valley View Cemetery for the moment of silence at 11am and to leave these tokens as our thanks.

I learned about the various colours of patina that copper was able to achieve with different chemical treatments. Blue, green, aqua and surprisingly enough, red! When heated coper is quenched in a solution of boric acid (Borax) and water, the coper is coated in a smooth dark red colour. Outstanding! The right colour, the right amount of permanence and some beauty thrown in for good measure!

Patterns are cut out of sheet copper and are textured with the narrow end of a light cross peen hammer. The texturing serves two purposes: to create a pattern more interesting and organic than flat sheet and to thin and define the edge of each petal.

Texturing of the pistil was accomplished with a round punch. this is purely to give some definition to the center. Following texturing, the pistil was rounded with a dapping block and punch to match.

From there, assembly! A little borax flux, a little silver solder and there you have it! Quenching the assembled poppy in the borax solution after each annealing built up the layers of colour. Some turned out much better than others, but with some repetition, I think they all turned out great! After I got the colour I was looking for, I scrubbed off any of the patina from the pistil and blackened the raw copper with a solution of liver of sulfur (potassium sulfide) and water.

Posted on

Decorative Dragonfly

Part 1 – Looking backwards on a wonderfully successful project!

Trying something a bit different for this one. As opposed to starting at the beginning and taking you through the process, I wanted to start with the finished product then add more details you can read through if you are interested. Let me know your thoughts on this in the comments!

Recently I have been taking online classes through the Deaf Children’s Society of BC to start learning American Sign Language (ASL). It has been an amazing experience and while I am far, far from being fluent, learning has been a lot of fun! Dellalee Piper is an outstandingly patient, kind and talented teacher and made every engaging and most importantly fun!

What does all of this have to do with Dragonflies made out of metal? Well, during the classes, there were the standard ‘I’m learning a new language’ trope of ‘What did you do this weekend?’. Let me tell you, there isn’t really an ASL sign for ‘blacksmith’! That lead to me sending a link to Dellalee for Hammer and Pen Co. and she immediately emailed with ‘Can you make me a dragonfly?!?!”. Naturally, I said yes! The results were better than I had expected (one of these days I’ll have a little faith in my abilities, I swear!)

A huge thank you to the always talented Aaron as well! This was the first completed collaboration between the two of us and I can see many more in the future. His knowledge of insect biology and proportions as well as the ability top sketch the wing details really made this possible.

So…if you want to take a look at the details on how this project progressed, I’d love to hear from you!

Lets be honest, I’m going to post it regardless…but I would love to see if there are folks looking!

As always, take care and keep making!

Posted on

Feeling Knotty!

Shelves! Everyone needs shelves, right?

If I was taught anything by my parents there are three secrets to a happy life: good food, good booze and good friends to share them with! While recently there has been little opportunity for the sharing part of things, I found myself running out of space in the liquor cabinet. We had recently renovated our kitchen and I had a brand new blank wall to play with; why not build some shelves! I wanted something interesting other than traditional scrollwork and started playing around with some bar stock in the basement.

All in all, the knot part worked out well! The ‘getting the knot sorted out in the angle iron’ was a different story! Again, I apologize for not having pictures of the trial and error…one doesn’t think to take pictures when in the midst of things! Now, if I had an intern…but I digress!

The wood here is actually quite interesting in and of its self! We live in a house built in about 1903 and during the initial renovations my father in law was smart enough to salvage as much of the original timber as possible. This straight grained, clear pine is amazing stuff! Rough-sawed to 4″x 2″ it has been weathered in place for over 100 years and looks amazing. I asked him to prepare three boards for me and he provided these outstanding planks by ripping them in half (ish) to about 3/4″ and laminating them together. Couldn’t be happier!

Now, the angle-iron could have been worked better by me! Getting things square by eye is…interesting. I did not succeed exactly, but they were good enough for what I was doing. After all, in a house over 100 years old, nothing – and I mean nothing! – is square or plumb!

As you can see, I tried a few things out on the bars. Didn’t love the hammered texture, but in looking at it again if I had textured the entire bar I think it would have come out much better. All in all, I was pretty happy with how they turned out! I need to work on my forge welding (don’t tell anyone; I cheated again with the MIG gun…), but that is something that will come with time.

As always, keep making stuff folks!

-Russ

Posted on

The Cleaver Is Done!

Part 3 of the Cleaver Project

Well folks, it is done! The cleaver’s final heat treat and handling went perfectly!

Really nothing much to say about this process; it was a lot of sanding, checking of fit, sanding more then polishing. So. Much. Polishing.

To be honest, I really don’t love the look of the ‘forge finished’ blade. I love the look of shiny, mirror-polished metal!

That said, I think it all worked out really well! Shane (the customer) was so excited that when I called to tell him I was about an hour from delivering it, he went and bought a chicken just to try it out! Worked absolutely flawlessly. No nicks, no rolling, no splintering of bone when going right through any part of the carcass. Total success!

I think the highest compliment he gave me was the following day when he decided to try it out on cutting some prime rib steaks; told me that it performed as well as the Shun chef’s knife he has and that he know wants a complete set to match the look of the cleaver. Couldn’t be happier!

Thanks for reading all, and if you are looking for something like this, reach out and let me know!

Posted on

Weathervane: Complete!

Part 2 of the Weathervane – boy am I every happy with how it all turned out!

It is not often that I can say that I like I piece when I’m finished. Oh, its alright I’m sure and I can imagine that there are few that would be able to see the flaws…but I can see them. They stand out like neon stripes on a black background and it is all I can see!

This one though, for what ever reason, I could see past them and for the first time I can honestly say that I am proud of what I made. Is it perfect? Nope! For one, I am a terrible welder and there really wasn’t a practical way to attach these small elements without the use of my trusty metal glue-gun (solid core MIG welder). But, as the saying goes “A grinder and paint makes me the welder I aint!”.

Each of the arms was done free-hand. I had thought about making up a jig of some sort for the scrolls, but it would have taken longer to make it than to do up the four of them. I did however make the first and use it as a template for the others! I think that all in all they each came out similar enough to be coherent, but unique enough to know that it wasn’t machine made. Again, are they perfect? Nope! Somehow that is OK though!

The spinning bit took some time to figure out. I wanted to ensure that the arrow and unicorn would be able to be as free as possible for as long as possible, so I moved away from the traditional design of a hardened pivot point in a receiver of some sort and went for two of the tiniest sealed ball bearings I could find. Again…I need to take more pictures! Regardless, I machined in two races top and bottom on the vertical post and pressure fit them in place. Given there isn’t going to be any force on the part, I didn’t feel the need to mechanical fix them in place. On the base, I machined out a plug for the bottom and a bushing for the top of the vertical pipe. The bottom plug was drilled out to receive a mild steel rod the correct diameter to fit into the bearings (3/16″) and the bushing was there to add some rigidity to the system. Again, given that this wasn’t going to be seeing any meaningful load, I simply press fit the rod in place as this is the first thing that is going to get damaged by an errant soccer ball!

Finally, after assembling I decided to go with an outdoor matte rust paint rather than a traditional oil/beeswax finish. I wanted this to be as low-maintenance as possible while being able to withstand the elements. Ultimately, I think I may have made the wrong call. I couldn’t find a rattle-can in matte, so opted for brush application. It was such a thick paint that the brush strokes were fairly evident on the flat surfaces…not as awesome as I would have liked! Perhaps once the paint has worn off and the rust started in, I will take it back to the shop and give it the more traditional finish. Who knows?!

And here it is in all it’s glory!

I love it!! It works perfectly with the playhouse and I think the proportions are right on. Will I make another one? Totally! Just let me know what you want it all to look like. Will I hand-cut an intricate little unicorn out of mild steel sheet? Hell. No.

Remember; just because you don’t know how to do something at the outset, it doesn’t mean you can’t sort it out!

Posted on

I made a weathervane!

One never knows if one can make a thing until one tries!
(Unicorn Weathervane Part -1)

I think I may have mentioned it before, but I LOVE making things! Especially things that I have never tried before. So when a very close friend of mine asked out of the blue whether I could make a weathervane similar to one she saw online, I jumped at the chance. Heck, any excuse to try something new right!

First things first when taking on any new commission; make sure you and the client have a clear understanding of both what the expectations are (timeline, costs, etc.) as well as what the thing is going to look like! For this project, there were some basic size requirements as it was going to be installed on the top of a child’s playhouse, so things like proportions and weight were a consideration. I had thought 1/4″ or 3/8″ stock was going to work, so I did up a couple of test twists both to get the right look and to see what the visual weight is going to be. After sharing these tests with the customer (boy, this really feels ‘sanitary’). After sharing these tests with the amazing and outstandingly awesome Jamie Hudson, she and I agreed that both of these sizes made for a really bulky looking piece. More tests, more conversation and we decided the 3/16″ bar was going to be the right call.

After getting the final go-ahead, it was on to the actual making of the bits and pieces!

Unfortunately, this is where the pace of the shop outweighs the picture-taking. I really need to sort out a better way to do work in progress shots…but that is for another time. Needless to say, there were a couple complexities with the final bar sizing; the most significant of which was the fact that flat 3/16 bar stock smaller than 1/2″ wide doesn’t exist! All the scroll’s stock needed to be flattened out from 3/16″ round stock. Not the biggest issue as mild steel moves like playdough when hot, but it was interesting to see how things would likely have had to be done ‘back in the day’ when things like the Metal Supermarkets didn’t exist!

Hand sawing metal sucks. A lot. Like, a whole lot!! In hindsight I really should have outsourced this to a fabricator with a plasma or waterjet CNC setup…but you live and learn!

Next up, assembly and finishing!

Posted on

Isn’t Metal Already Hard?

The Cleaver: Part 2

Back in the shop and today was all about refining the shape, rough grinding and then the most nerve wracking process for a cutler; hardening!

Again, I am faced with the shadows of envy when I start writing a post. The envy being that my fellow artists here have the luxury of not only having a clean space for taking pictures (it is amazing how quickly the speakers on one’s phone collect metal dust and shavings in the shop), but that they can take pictures as things progress easily! In smithing one has about 15-30 seconds of workable heat (depending on the mass of material you are working with) once you take a piece out of a forge. Of that, only the 3/4 of that heat is useful for effectively forging out material. The rest is straightening and truing up material. Every heat takes time and also adds scale to the material and reduces the overall mass, so fewer heats is always best to maintain the cleanest end result.

But I digress. The end of all this wining and excuses is this: I will do what I can to get interesting ‘Work in Progress’ pictures, but there will be some inevitable gaps in process. Best thing is to get in touch and book a quick intro lesson to see it all for yourself (yes, yes…shameless plug. Totally ineffective given a global pandemic too!)

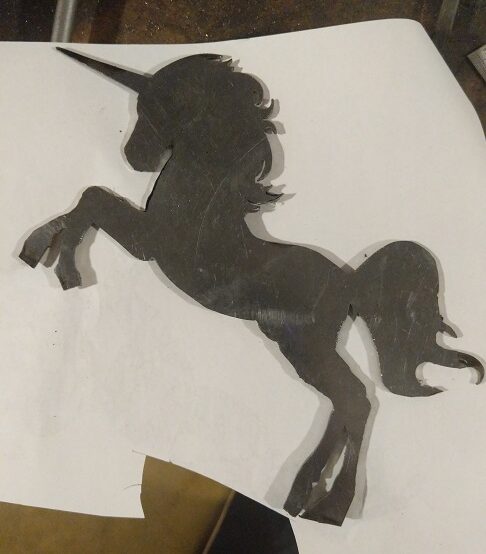
I try to forge as closely as possible to final shape given that I enjoy smithing and not so much grinding! Regardless, I am not proficient enough to eliminate the entire cleanup process with a grinder and above, you can see the layouts for the final blade shape. Further, the integral bolster was refined on the bottom roller of my Oregon Blade Maker 2″ x 72″ belt grinder. I lucked out that it was the right profile, but I think that the next thing on the ever evolving shopping list is going to be a set of small-diameter contact wheels. Getting into tight radius areas when shaping things like handle transitions and such is just so much nicer to do via power tools rather than files!

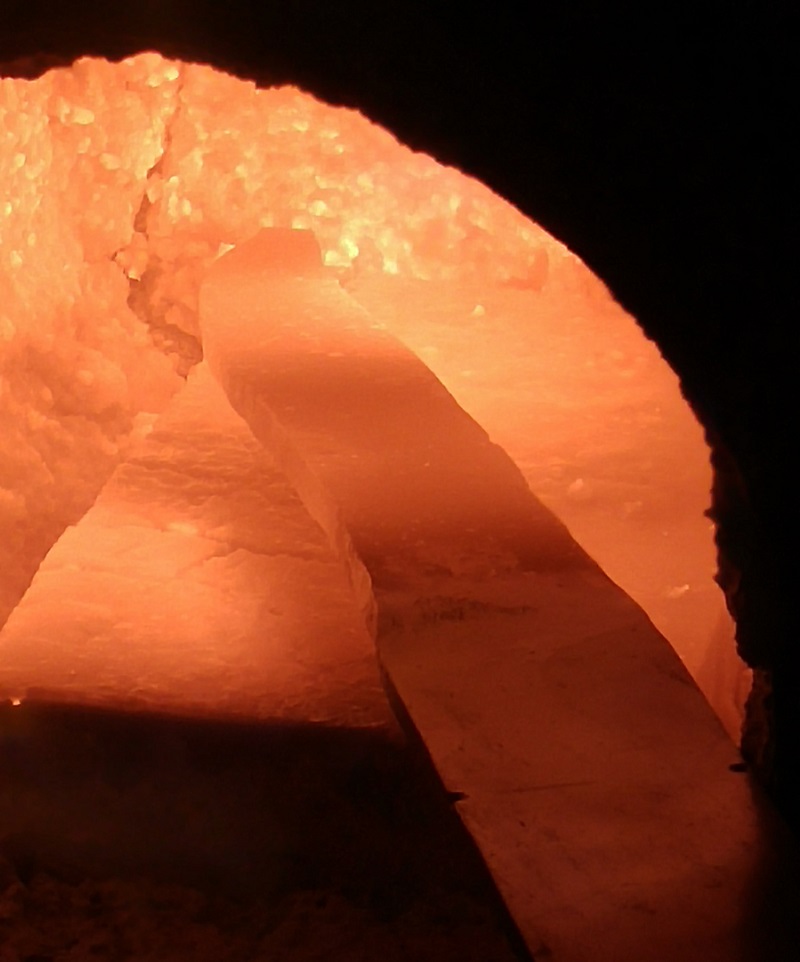
After rough shaping, it is all about the heat treatment. Heat treatment is the process where one takes the material to a specific temperature, then quenched in order to increase the hardness of the material. I’ll get into the specifics of all that in a later post (I find it fascinating, but I can imagine that it isn’t quite as interesting as glowing metal). First stage of heat treatment however is normalization: heating the material above the critical temperature, holding it there for a period of time, then cooling off in air. During heavy forging stresses develop within the crystal structure of the metal. This normalization process serves to normalize the entire structure and both reduce the likely of fractures and refines the grain structure (again, more on this later when I get into Shop Metallurgy).

So pretty isn’t it! After the normalization, more grinding! You can see that there was some additional material I needed to deal with at the tip to even out the thickness. Following normalization and any additional tweaks, it is time for the quench! Take a piece of hardenable steel (again, more on that later), bring it past the critical point and rapidly cool according to the material requirements. For most spring steel, this quench happens in warmed oil – I use canola – as it achieves the correct speed of cooling. Other steels will have different requirements and require either faster or slower quenches. Some steels also harden when cooled in still air (most stainless steels).

Know what you are using and apply the correct heat treatment process! This is one of the biggest dangers of Mystery Scrap Steels – you really don’t know what it is you are using. You can see if it is a mild, carbon or stainless steel, but the specifics are lost without a metallurgical analysis unavailable in a small shop.

And again, I digress…

After the quench, the material is exceptionally hard (if you did everything correct) and therefore brittle. To make this a useful tool, one needs to strike a balance between hard/brittle and soft/malleable. This process is tempering – bringing a material up to a significantly lower temperature to loose some of the hardness and bring in a level of malleability. For this material, a 400°F for two hours – repeated twice – brings down the hardness to a nice balance!

Yes, I used my kitchen oven. This process isn’t any different that seasoning a cast iron pan! I would like to draw your attention to the hammer marks on the blade for a moment. I always try to forge as clean and straight as possible, however the customer wanted a ‘brute du forge’ look for this blade to reduce material sticking to the blade when getting through large chunks of animal. As I had completely forgot about this and was exceptionally careful about forging as clean as possible, I then had to add back the marks. Ahh well, lets consider this a lesson in ‘Pay Attention to the Design Brief!’.

All in all, I think it is coming along very nicely! The next part will be all about finishing and adding a handle! To be honest, my least favorite part of the entire process…

Posted on

Birthday Shop Day!

When you can’t go do anything really fun with your nephew for his birthday due to Covid-19, build things!

One of the coolest things that my partner Melissa and I have decided to do for our niece and nephew is our ongoing plans for their birthdays. While everyone loves getting stuff (read: toys!) for one’s birthday, our niece and nephew have a number of other relatives that more than adequately fulfill that need. We had heard this plan from one of our fellow paragliding pilots and loved the idea: give experiences, not stuff! So, starting on their 9th birthdays, we started to give them the gift of ‘Whatever you want to do today, we will go do!’. So far there have been two day-long trips to arcades and a trip to a pottery studio.

This year was supposed to be a fossil hunting trip to Vancouver Island, however Covid has made that an uncomfortable and very possibly dangerous process what with ferries full of boneheads who can’t seem to understand how polite society behaves during a global pandemic! So, the proposal was made to spend the day in my shop and make some stuff! Specifically, making a set of three lache bars for W’s home Ninja Gym.

It was such an outstandingly amazing experience to share what I love with my nephew! He was amazing too; before this he had never used a power tool in his life with the exception of a hot glue gun! He paid attention, listened and above all asked questions when he didn’t understand something. I had been prepared to do most of the work and have him there just helping out however in reality and without any Uncle Russ Hyperbole he did 95% of the work!!

We went through the whole process of design, dimensions, sourcing materials, marking, drilling, cutting and assembling in about 4 hours. The nice thing was that the 36″ threaded pipe was the perfect size for his needs (he wanted 34″ long bars), so our work was largely reduced to marking out and drilling holes, then cutting bolts to length prior to attachment. We got done about an hour before dinner, so I suggested we could do a bit of smithing; you know, if he wanted to…Enthusiastic nodding ensued and a small coathook was made! I had to do a bit more here as the anvil was just a bit too tall for him (I will be now on the lookout for an inexpensive small anvil to add to the tripping hazards in my shop), but he loved the whole process!

All in all, an outstanding time had by all! 14/10 Would do again with either him or his sister M!

Posted on

New Life From Old Junk

The Cleaver – Part 1

Beyond just the general satisfaction of building things, the joy of blacksmithing is the process of taking something worthless and changing it into something new and beautiful.

A very close friend of mine is an outstanding chef (no, not Devin this time…we have plans in the future though!) who looks for perfection in all he does. Part of that search for perfection is the desire to take primal cuts and break them down to get exactly what he needs. To work these cuts, he needed a better cleaver; good thing for him, he knows me!

There are two ways one can approach a tool build; use a known steel to get exactly the properties you need, or you can use found material. In this case, given that the only technical requirements for a cleaver are essentially mass and strength, I thought this would be a great place to use an old truck leaf spring given to me by a coworker.

First stage is breaking the bloody things down! That was a process! Nothing a little (a lot) of messing about with an angle grinder. I had presumed that the springs weren’t under tension when they weren’t installed…I was wrong! Other than a bit of a surprise, no other ill effects; but I will keep that in mind for the future!

Manhandling the raw material around was a task to be sure! I unfortunately didn’t get any shots of the initial forging, but once the material was starting to get broken down the process started to get easier.

While possible to do this work only by hand, the progress to this point would have been nearly five times as long without this little beauty of a tool – my 16 Ton forging press from Coal Iron Works!

From bar to rough forged was four hours with this marvel of modern technology! I would suggest that this process would have been likely in the 15-20 hrs worth of hand hammering to get to the same point. While I love traditional methods, I do like to finish projects! Not to mention that my soft, office-worker body just isn’t conditioned to do that much work with a sledgehammer…

Next up, refining the shape and the joys of basic metallurgy! Until then, take care and keep making things!

Posted on

So It Begins…

…and I can’t wait to see where it all leads!

Well folks, this is really happening! Seems like a long time ago since Aaron and I were chatting on a walk (or was it the deck?) about this crazy concept of blending metalwork and fine art together. What with all that has gone on in 2020, November 2019 was a lifetime ago in a different world! But now, in the midst of a global pandemic, it looks like this idea is going to happen! In fact, it is happening right now!

We have a website that looks awesome (thank you for the skull-sweat on that one Aaron! I would have tossed a keyboard out the window long before getting to this point) and two more amazing artists who have decided to join us on this little ride. Sabrina, Devin, it is so good to have you both here! Welcome to the fun and games…please be patient as Aaron and I bumble our way through the first shaky and tentative steps.

I believe that this group is something that has the potential to be amazing. A collective of artists from across the spectrum working together not only to pool resources, but to collaborate in new and exiting ways just feels good!

So, thank you to everyone for your time, effort and above all patience during the building of this site and the logistics that went into it. A special and heartfelt thank you again for all of your hard work Aaron in getting this site made real. And a thank you to everyone reading this! Art – in whatever form it takes – needs an audience. Thank you and I hope that you stick with us as the Hammer and Pen Collective grows and thrives!

Er…there is someone reading this right? Right?!